For this tutorial I have decided to share my journey of making a mini zen garden and imprint spheres, along with what I found to be helpful. This was the first time I had ever tried to create a zen garden, it was a fun experience and I highly recommend it!

Zen Gardens are a great way to relax and let your mind wander, they are also helpful for artist block. Mini gardens are perfect for people who don’t have enough time or outside space for a full size garden. A mini zen garden is great to set in workplaces, a decorative shelf, on a counter, or anywhere that is convenient.
Step1: Setting up for your garden

Making sure you have all the supplies needed is an extremely important part of any project. It is also crucial to have a good workspace that will be beneficial to what you are trying to do. Creating a mini garden may take a few days when you are molding items out of clay, so be sure that you are working in a space that will not be in the way for other day to day things.
Supplies:
Once you have a good spot to be you will need these supplies:
- Clay (I used air dry clay)
- A protective covering for your workspace
- Tools to work with your clay
- Fine sand
- A tray to put your sand in
- A cup of water
Optional supplies:
- Gloves
- Mini zen garden rake
- Paint
- Clay sealer/ modge podge
- Other decor for garden
A major part of setting up your space for a project is keeping things organized and clean, even throughout the creating process.
Step 2: Shaping the Imprint Spheres
For this part of the tutorial I will explain how to create the first sphere in depth then briefly go over the other methods I used to make different styles.
Ball #1: Craters

This was the first ball I made and is one of my favorites. (Tip: When working with clay I find it helpful to wear gloves to keep it from sticking to me and prevent my skin from drying out.)
Tools:
Before getting out your clay, decide what tools you will be using. Each style of zen garden balls will need different tools.
For this sphere the type of tools you need is anything with a rounded end. For example you can use a pencil eraser or the other end of a paint brush, for smaller indents use a ball pin. Anything that you can find that will work like that is great. I happened to have paint dotting tools on hand so I used those.
Getting Started:
The first thing you need to do is take a chunk of your clay and roll it into a ball. The ball I made is about 1.5”. If you are having a hard time getting it fully smooth, lightly dip your finger in the cup of water and use that to smooth the surface. But be careful not to use too much water as that will ruin the consistency of the clay.
The pattern:
Note: this part is only for the craters style ball, but is helpful to know for the other styles of spheres

Then use your rounded tool to gently push indents into the ball. Start with the biggest size then work your way down to the smallest tool. I recommend three sizes of tools to get the best effect. Try to keep your placement as random as possible when deciding where to indent. (Tip: Every so often dip your tool into the cup of water so it is slightly damp. This will make it easter to create craters and prevent cracking) Continue to add dents until you are pleased with how it looks.
Finishing:
After I had finished I very gently rolled the ball in my hands to help reform its shape, then went back and redefined the pattern with my tools. It doesn’t have to be perfect, let the sphere have its little imperfections!
Drying:
If you are using air dry clay as I did, prevent cracking by: every once in a while throughout the drying process take a paint brush and dip it in water then lightly go over the sphere to moisten the outer layer. This will help the ball to dry evenly.
Ball #2: Squiggly Lines

After making a clay ball use a pointy tipped tool to trace lines going from the top of your ball to the bottom. Make the lines squiggly to add pattern.
Then use a fat butterknife type tool to deepen and widen the lines. This is another point that is useful to dip your tool in the cup of water occasionally.
If the ball is not fully round once you are finished, gently roll it in your hands then redefine the lines.
Ball #3: Bumps

This ball is roughly 1” in diameter
Roll your ball then make dents in it just like in ball #1. Only use one size of tool for this ball, preferably a small one.
Make many miniature clay balls that are just bigger than the indents you just made.
Then, using slick (a mixture of water and clay), place your mini spheres in the dents. Gently roll in hands to rounden.
Ball #4: Stars

This is the easiest way to make an imprint sphere. First find a tool or item that when pressed into the clay it will leave a deep pattern (see photo for reference)
After you roll your clay ball, press the tool into the clay to leave the pattern on your sphere. Dip the tool in water first for best results.
Roll in hands to rounden if needed.
Ball #5: Criss Cross

The ball I made in this style is about ¾”
You start by putting marking dots in six places across from each other on the ball, as if the ball were a dice and you are marking where the sides are.
Then draw connecting lines between the marks. (view picture for reference)
After everything is traced use a small pointy utensil on an angle to deepen and slightly widen the lines.
Then roll in your hands to restore shape then redefine lines. Don’t forget to dip your tool in water.
Step 3: The tray

You’ll need to locate a tray large enough to create patterns and a garden in. Also, it must be deep enough to contain sand without spilling.
I used a shallow hat box I found at hobby lobby. The perk of using this box is that it has a lid so I can put my garden away when needed.
Next you fill your tray with sand. I used 3 pounds of extra fine white sand to fill a 11.5”x11.5” circular box. Be sure your sand is fine or it wont show your patterns.
That’s it, that’s all you need for the tray.
Step 4: Decorating with Extras
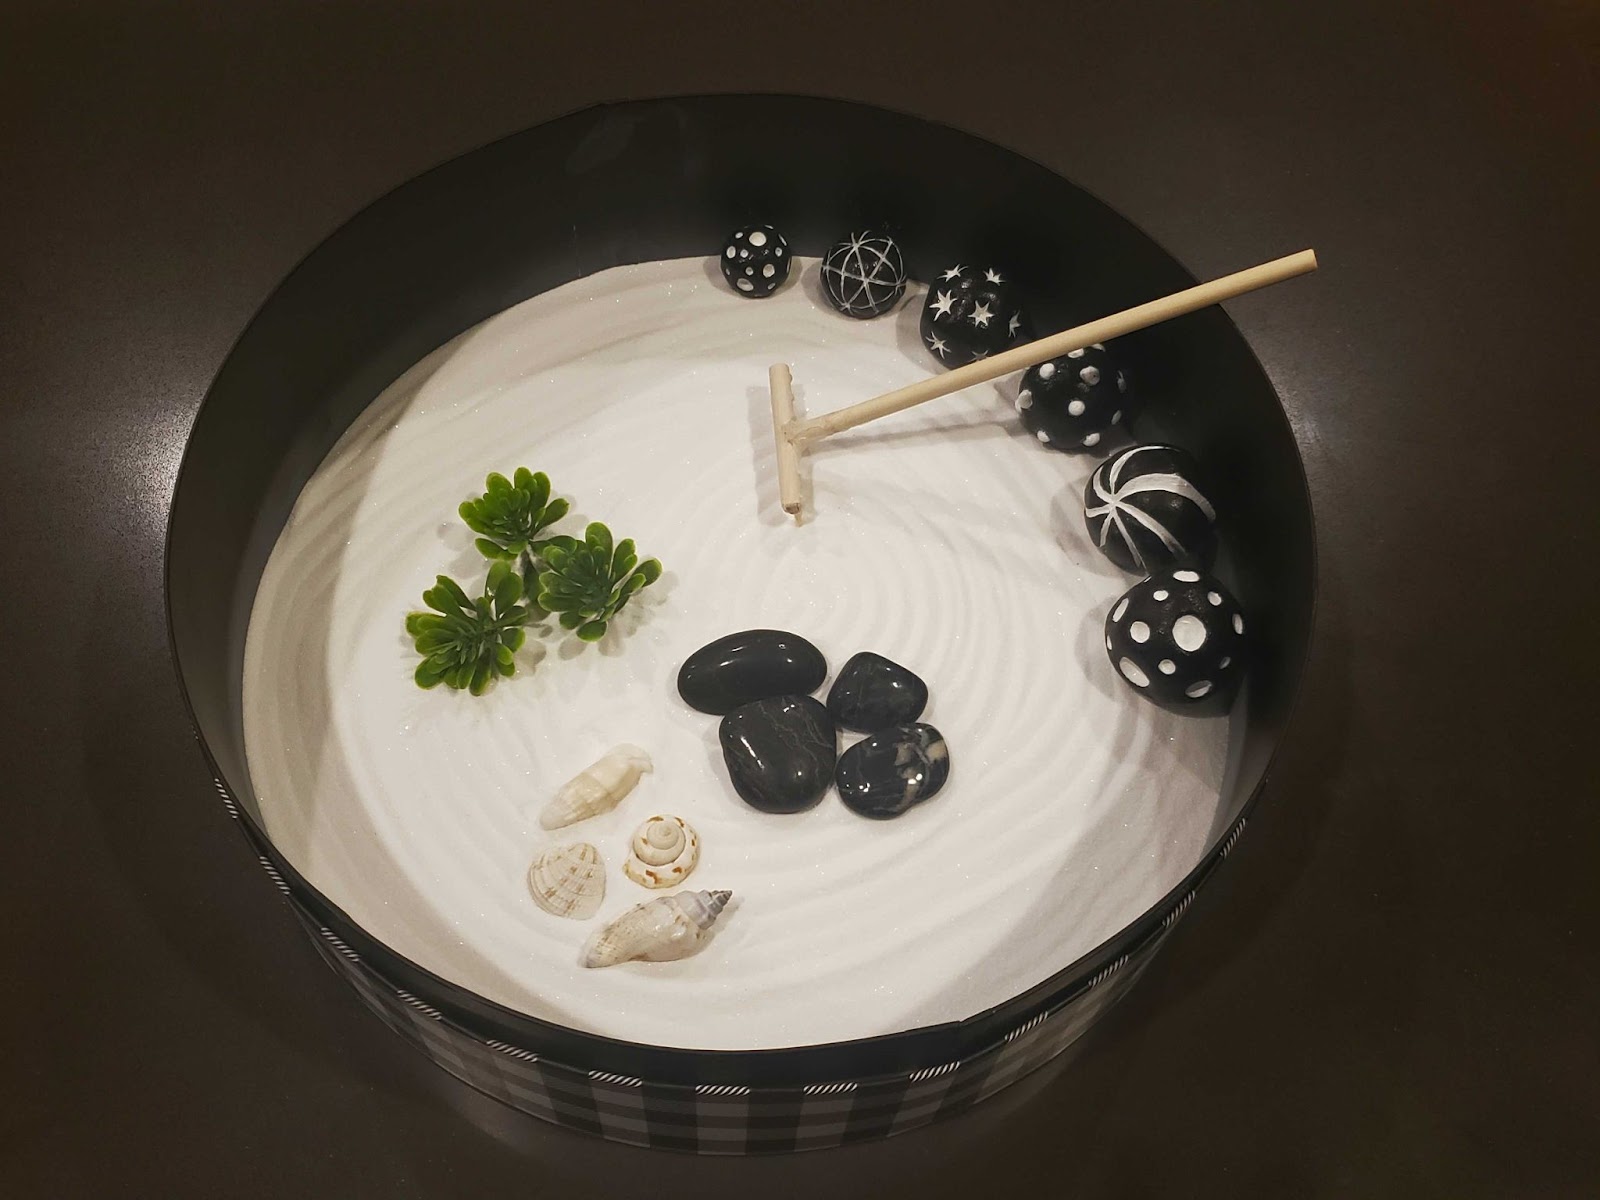
The finishing touches of a mini zen garden are what makes it beautiful, and you can have fun personalizing it.
Painting the imprint spheres is a great way to do this. A popular painting choice for them is planets. After you paint them it’s smart to seal them to prevent the paint from chipping. The sealing method I used was modge podge as that’s what I had on hand.
A classic addition to zen gardens is a rake. You can buy mini ones or make your own. I used dowels, toothpicks and hot glue to make mine. Or you can just use a plastic fork to make those characteristic lines or a pen to draw in the sand.
Other fun ways of decorating your garden are:
- Stones
- Mini plastic plants
- Seashells
- Crystals
- Animal figurines
- Fake moss
- Anything you want!

Remember to get creative and have fun with your garden. Make it however you want, you can totally be out of the ordinary and artistic. Zen gardens will help you relax and let your mind wander.
I hope this tutorial on how I created my first mini zen garden helped you! Video tutorial from a different creator: zen garden clay ball youtube
If you would like more details feel free to leave a comment or contact me!